Timing Chart
Flash CC version
Flash CC version
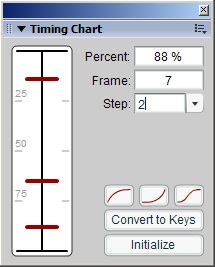
This is a SWF panel that mimics the timing charts used in traditional animation. To open the panel, go to the Windows -> Other Panels menu and click Timing Chart. To use it, select a motion tween, pick a frame step (2 if you're animating on 2's, 1 if you're animating on 1's, etc) or type in a step value, and then click the Initialize button on the Timing Chart. A series of sliders will appear on the chart representing each inbetween frame. You can drag the sliders up and down to adjust the spacing of the inbetweens. The top of the chart represents the end key, and the bottom of the chart is the start key. You can switch the top/bottom by right-clicking and choosing "flip chart". There are also three curve presets you can use to quickly adjust spacing; slow in, slow out, and slow in/out. You can edit multiple tweens simultaneously, but to work properly all tweens must be the same number of frames. This was intended to make motion tweens in Flash a little more user-friendly for traditional animators, but people used to digital animation may still find the curve presets handy.
If you're interested in how Flash plugins are made or you want to customize the panel, you can download the source file. Don't forget to change the publish settings so that it publishes to the correct folder on your hard drive.
Toggle Outline
Flash CC version
Instead of clicking Flash's built-in outline toggle for each layer, this allows you to select symbols on stage and use a hotkey to toggle them between outline and normal. When a symbol is selected on the stage, its frames are also selected in the timeline; the layers containing those frames are toggled. If no frames are selected (scrubbing the timeline will deselect the frames) then the current layer is toggled.
Toggle Guide
Flash CC version
Flash CC version
This works like Toggle Outline except it toggles the layers between Guide and Normal.
Layer Color
Flash CC version
Flash CC version
Instead of changing layer colors one at a time, this allows you to select multiple layers and change their color at the same time. Like Toggle Outline, you can also select elements on the stage to change their color rather than directly selecting the layer.
New Anim Clip
Flash CC version
Flash CC version
This is an automated version of "the Pringle". It creates a new empty symbol registered to the stage and the symbol is open for editing in place. A requestor pops up asking for the new layer name, the new symbol name, and a choice between Graphic Symbol (default) or Movie Clip. If the name fields are left blank the default name will be used (ie Layer 1, Layer 2, Symbol 1, Symbol 2, etc).
This is intended as a way to quickly compress an animation into a looping symbol that maintains the proper registration to the stage. Compressing the animation into a symbol allows you to easily manipulate the entire animation and seperating characters into their own animation clips can facilitate compositing.
To use this extension, select all the frames of the animation you wish to put into a symbol. Cut or copy the frames, then run the NewAnimClip command. After clicking OK on the requestor, right click the blank keyframe and click "paste frames". You can then exit the symbol and delete the layers that contained the animation.
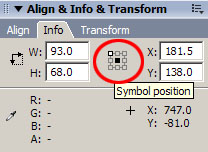
You can also copy/paste-in-place symbols from the stage into the new anim clip and they will stay registered. For copy/paste-in-place to work correctly the Symbol Position in the Info panel must use the symbols registration point (center box should be black).
Tween 2 Keys
Flash CC version
Flash CC version
This command will convert the selected tween to keyframes on two's. This is useful when you're animating on two's and you want to use tweens. Tweens are always on one's, and it looks odd to have an animation go back and forth between one's and two's, but converting a tween to two's manually is very tedious and prone to error.
To use this command, select the starting and ending keyframe of the tween and run the command. It converts the selected frames to keyframes, then clears every other keyframe. Because it is clearing keyframes there is the potential to accidentally clear a keyframe you wanted to keep, so use with caution and don't forget to save! It will not clear the last keyframe in the selection, even if it is on one's.
This command can take a while to do its job if you a lot of frames and/or layers selected. It was intended for short segments of character animation, but if you have some long tweens (like camera moves or panning BG's) then it's probably best to do one layer at a time to prevent Flash from running out of memory.
FrameEDIT
Flash CC version
Flash CC version
When doing character animation it's not uncommon to have a symbol that contains all the elements of the head and face, and many animators will nest the facial animation within this symbol. When you double-click a symbol to edit the nested animation, Flash always rewinds the timeline to frame 1. This command remembers which frame you were on when you edit it; if you are on frame 247 and you decide to want to put a blink there, you simply select the head symbol and run the command. It will edit the symbol in place and the timeline will stay at frame 247. If the frame doesn't exist then you will be taken to the last frame in the symbol.
If the symbol you have selected is set to Single Frame instead of Loop or Play Once, when you run frameEdit you will be taken to the frame that is currently displayed on the stage (this frame is confusingly called "First Frame"). For example, if you're using a hand symbol that has 30 frames, and it's currently displaying frame 27, when you run frameEdit on that symbol it will edit the symbol in place and you will be taken to frame 27.
FrameEXIT
Flash CC version
Flash CC version
Similar to FrameEDIT, this takes you to the frame you were last editing when you are done editing a symbol. This is a little different from when you normally exit a symbol, which takes you to the last frame you were on before editing the symbol.
Multi Swap
Flash CC version
Flash CC version
Multi Swap allows you to swap multiple symbols at once, and allows swapping symbols across multiple frames. The symbol(s) on the stage you want to swap out, then select the symbol in the library you want to swap in, and run the command. This is great for transferring animation from one character to another character with a similar build, or if you need to start animating an incomplete character you can swap the incomplete parts with the completed parts after you've done the animation.
Merge Layers
Flash CC version
Flash CC version
Merge Layers will merge unlocked layers into a single layer. If you select a range of frames, only unlocked layers in that range will be merged. Be warned that when dealing with selected ranges of frames, all unlocked layers for that range will be merged, not just the selected layers.
Draw Guide
Flash CC version
Flash CC version
This draws a guide line on a new layer using the selected symbol's center as the endpoints in the line. This facilitates creating guide layers for path animation. First, block out the path you want your symbol to take. Then select those keyframes and run the command. A new guide layer will be created with lines following the path of your symbol, which you can then adjust to your liking.
Trace Sequence
Flash CC version
Flash CC version
This allows you to batch-trace bitmaps across multiple frames rather than doing it one frame at a time. Import a sequence of bitmaps (Flash should automatically place each image on its own keyframe on the same layer) then select the frames you want to trace and run the command.
libAppend
Flash CC version
Flash CC version
This command will add a prefix, suffix, or both to the selected items in the library.
Break Into Layers
Flash CC version
Flash CC version
This command will break apart the selected symbol and distribute it to layers using the same layer names and colors that were nested inside the symbol.
Magic Tween
Flash CC version
Flash CC version
Magic Tween will add a tween to the selected frames, but it first checks the contents of each layer to determine if a shape or motion tween should be used.
Frame Extender
Flash CC version
Flash CC version
Frame Extender will extend the length of each keyframe by the amount entered by the user.
Search and Replace
Flash CC version
Flash CC version
This will search for and replace text in the names of Library items. You can search all Library items or only the selected items.
Frame Jumper
This is a Movie Clip you can add to your scenes to use when testing SWFs. The Jump To buttons will jump to the frame number on the button, or you can type a frame into the text box. The Skip By buttons work the same way but will skip ahead by the number of frames specified. The Loop Frames option will loop the animation between the frame numbers typed into the boxes below the checkbox. The Quality combo box sets the rendering quality of the SWF. This only works for ActionScript 2 projects.
Installing Extensions
To install the extensions you need to have Flash MX2004 or higher, and Extension Manager 1.6 or higher. Extension Manager is installed with Flash 8, if you're using MX2004 you will need to download it from Macromedia's website. After you download the extensions simply double-click the mxp file and Extension Manger will open and install it. There is a bug in Extension Manager that tells you Flash must be restarted to run the extension; all of these extensions (except for Timing Chart!) are custom commands and do not require a restart. All custom commands are accessed from the Commands menu in Flash, and can be assigned a hotkey from the Edit menu. Timing Chart is a WindowSWF panel, and requires Flash to be restarted. It is accessible from the Windows -> Other Panels menu.

